Patriotic Porch Decor

Last week I shared with you my budget friendly patriotic vignette and today I’m going to share with you a couple of the small additions I added to the porch to give it a patriotic flare.

I am leading a women’s crafting small group at my church and last week we made these fabric strip flags. They’re super easy, affordable and perfect to hang on my front porch post. I just got several different types of fabric, cut strips and hot glued them on a paint stick, super simple!

Patriotic_Decor_V3

The previous owner of our last house left this clay pot out front. I have spray painted it several times and it’s chipped and in rough shape but I still love it and use it and as I always say “FREE is for ME”. I added a pinwheel from Walmart just to make it a little festive. And if you’re sitting on the porch in a rocker, you NEED a glass of sweet tea, right? 🙂

Patriotic_Decor_V

I bought these outdoor throw pillows from Home Goods and loved that they were red white and blue but not too patriotic to be seasonal.

Patriotic_Decor_V2

IMG_1571


My Budget Friendly Patriotic Vignette

You may remember my budget friendly Easter vignette that cost me under $10, well now I’m back to bring you my budget friendly decor for Memorial Day and the 4th of July! This is my first time to decorate for Memorial Day or July 4th so I tried to be creative with DIY and as many budget friendly ideas as possible.

Patriotic_Decor_V4


I didn’t want to buy a new wreath and I didn’t have time to make a cool rustic flag so I just hung a DIY burlap hanger that I made last year on a wreath I already had. Burlap hangers are very inexpensive DIY projects and there are so many cute ideas out there.

Using some scrap burlap I had in my craft supplies, I made this pennant banner. I just used white and red burlap and painted two pennants blue with some stars. This was a quick and free DIY project to use with my patriotic vignette.

I already had blue candles and printed a free printable I found online to frame.

Patriotic_Decor_HI painted and distressed some mason jars I had around the house (FREE) and just hung these cute galvanized stars that I got from the Target Dollar Spot. The flowers were some I already had and the little sign was a clearance find from Kirklands around Thanksgiving.

Patriotic_Decor_V5I love using thrift store books to add height and color. They’re really inexpensive and an easy decor item. I already had some decorative ball filler that was red and natural so I picked up a few from the thrift store and spray painted them blue to use along with what I had. It’s inexpensive and easy filler for lanterns or bowls, baskets, etc. The little blue vase with twine was a clearance find from Hobby Lobby that I picked up this week!

Patriotic_Decor_H2

This entire Patriotic vignette cost me less than $10 by using what I had and utilizing thrift store finds.

Here is my cost breakdown:

  • Stars – $2
  • Thrift Store Decor Balls $1
  • Thrift Store Books $1
  • Flag from Walmart $1 for 4 pack
  • Blue vase with twin – Hobby Lobby $1.60

My goal for sharing my holiday decor is to share that it doesn’t mean you have to go buy all new holiday decor if you want to decorate for the holidays. Be resourceful with what you have and what you can DIY. There are lots of cute patriotic printables on Pinterest for banners, flags, pinwheels, etc. I am not a fan of spending a lot of money to decorate on holidays other than Christmas but I love changing it up a little for a month or so!


DIY Simple Christmas Arrangement

Can we talk about how exciting it is to pull out all the clearance goodies I got after the holidays last year? It’s like Christmas came early! I always like shopping for Christmas clearance goodies to use the next year! Last year I picked up two boxes of LED branches that were on clearance at Kroger and was so excited when I stumbled upon them when I got out my Christmas décor for this year.

I wanted to use these LED branches in an arrangement but I didn’t want to spend a lot of money on the items to put one together. I had all of these supplies except for the filler beads which were half off (thank you Hobby Lobby). This project literally took me 10 minutes and was SO simple to put together! If you don’t have LED branches and don’t want to buy them you could substitute them for tree branches (FREE) and spray paint them and add glitter (if you so desire).

DIY_Christmas_Arrangement2

Here is what you need:


  • Glass Vase
  • LED Branches or tree branches painted
  • Christmas “Itsy Bead Sies” or any small decorative filler item
  • Ribbon
  • Poinsettia or other decorative flower


Here is how I made it:

  1. Put the LED Branches into the glass vase and push the branches all the way towards the back of the vase. (If you are using this as a centerpiece you will want to have a larger vase and more filler to hide the battery packs and also will want the branches centered into the vase with filler all around)
  2. Fill in the vase with the “Itsy Bead Sies” or other decorative filler item and try cover all of the branches from the front and sides.
  3. Wedge the LED battery packs behind the branches in the back of the vase where they’re accessible but not easy to see.
  4. Tie a bow or two around the top of the vase
  5. Clip a Poinsettia on the front of the bow or vase

It’s really that simple and can be very inexpensive if you have many of these items.

DIY_Christmas_Arrangement3

DIY Fall Cotton Wreath

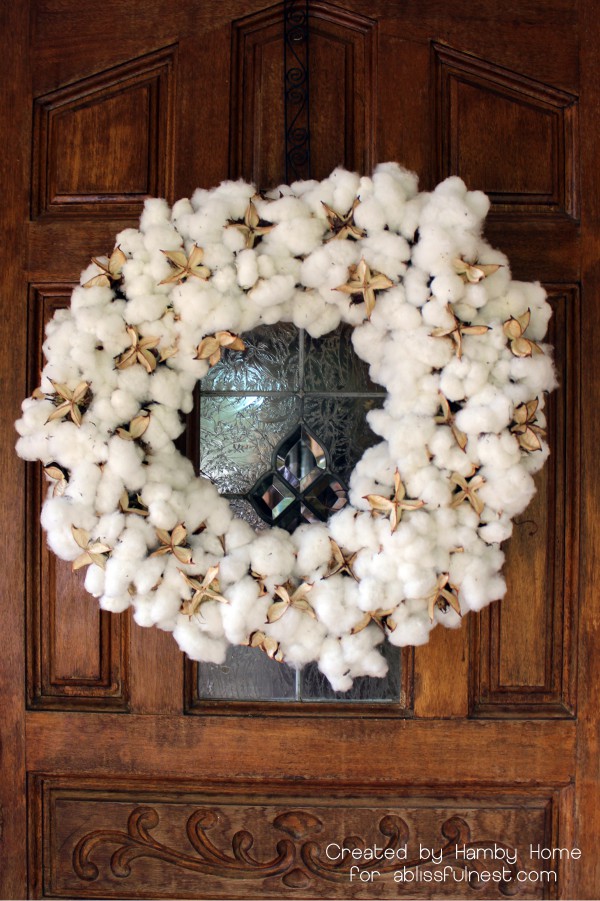
Remember that cotton wreath that I shared with you a couple weeks ago that I shared over at A Blissful Nest? Well I’m going to share with you how I made it!

I’m fortunate enough to live in an area that has abundant amounts of cotton fields. We may not get a lot of snow here in Alabama but the cotton is ripe and has that same snow-like beauty. I’ve seen cotton being used in home décor a lot lately and I’ve been dying to get my hands on some. Ever since I saw a cotton wreath for sale in a local gift shop, I’ve been anxiously waiting for the cotton to be in full bloom. I’m the type who would rather make something myself to avoid paying retail price so today I’m going to show you how to make a very simple fall cotton wreath!

DIY_Cotton_Wreath

Supplies needed:

Supplies_needed

  • Cotton stems
  • Grapevine wreath – (Mine is a 15 inch)
  • Hot glue
  • Wire

Steps to make a cotton wreath:

1. Collect your cotton. This might be more challenging for some of you than others. I got a small trash bag full of cotton from a friend with a cotton field connection for free but I realize not everyone has access to free cotton. You can order cotton from Saves on Craft or Cottonman if you don’t have access to a cotton field.

2. Prep your cotton. Cut your stems to be roughly 2-3 inches long. If the cotton is really ripe, some of the cotton will start separating from the pod which is fine, just remove the cotton and set those pods aside in case you would like to use those in your wreath to break up the texture. Keep this in mind if/when you’re cotton picking, you may want to pick stems that look a little less mature.

Cotton_Prep

3. Start attaching cotton to the wreath. The grapevine wreath is perfect for this project and is so easy to use with the cotton. Cotton naturally has a bend in the stem which is perfect for wedging in the grapevine wreath and it sitting up just right. Wedge the cotton stem all the way through the wreath and then use a dab of hot glue to secure it to the wreath. Repeat until wreath is covered. I tried to stagger the cotton a little so there was no clear pattern to where I was placing the cotton.

Cotton_Application

Optional: I chose to add the pods to give the wreath a little different look and texture. I just used the pods sporadically in between the cotton bulbs (where you may have an empty space naturally) and would secure them to the wreath with hot glue.

Pod_Gluing

4. Add a hook. Once the wreath was complete, I looped some wire through the back of the grapevine wreath and twisted it to create a hanger for the wreath.

Wire_Hanger

5. Add Accents (Optional). Using floral wire, add a burlap bow or any other accent piece to your wreath. I loved the texture of the cotton and pods and decided to leave a bow off of this one but I can always add one in the future!

That is all! It’s super easy and perfect to use with all the fall decor! Sorting through my bag of cotton and cutting the stems was the most time consuming part of the process.

Cotton_Wreath

Cotton_Wreath_Fall_Porch

Here are a couple pictures of another cotton wreath I made with less pods and with an added burlap bow!

DSC_2129 

DSC_2132

Note: Cotton is fragile so keep an eye on the wreath and if any stems start coming lose, just reinforce with more glue or floral wire if necessary.